How to draw Shoto Todoroki Step by Step
How to draw Shoto Todoroki with this how-to video and step-by-step drawing instructions. Anime drawing tutorial for beginners and everyone. Also, read easy scary drawings
Step 1
One of the most noticeable and recognizable aspects of Todoroki’s design is the loose hair that falls across his face. His hairstyle can look cool, but drawing can also be challenging! Luckily, this guide will show you how to break it down into more straightforward steps to ensure it doesn’t get annoying. The hairstyle will be drawn with some circles on top, and there will be lots of straight lines curving down to the sharper points for the spikes in his hair. His hair is parted, so we’ll draw it in two, with this one on the right. Remember to leave some space to the right of this hair shape, as we will add another section there shortly.
Step 2 – Next, draw more of his hair and ears
We’ve covered the gap on the right-hand side, and as promised, we’ll fill it in this step of your Todoroki drawing. To do this, draw some more sharp curves on the side, so his pointy hair falls more. Then use a smoother curve for his ears to stick out from the hair, as shown in the reference image. Then move on to step 3!
Step 3 – Finishing His Hairstyle
Earlier in this Todoroki drawing tutorial, we talked about how his hair was separated into two parts, and we are going to draw the second part now. The left part of the hairstyle will look very similar to the first half, almost a mirror image of it. Using the same spiky lines as before, draw the left side of his hair. Then we can start drawing his face in the next section.
Step 4: Now, draw his facial features.
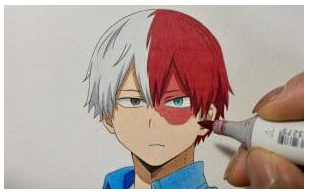
Now that you have finished your Todoroki hair, we can start drawing his face. Use a curved line with a rounded tip at the base for his face and chin contour. Don’t forget to draw his other ear on the left side! His nose will be marked with a straight line with two dots underneath, and his mouth will also be removed with a thin wavy line. His eyes will be drawn with some rounded shapes with sharp edges, and you can remove his pupils using two small circles dotted inside them. Finally, draw a curved line on the upper right side of the face for his distinctive scar.
Step 5 Shoto Todoroki Finish Todoroki’s Chest and Shoulders
For this fifth step of the Todoroki drawing tutorial, we will finish drawing his body so you are ready for the final stage where you can colour him. He has a high collar on his head, so we’ll start with that. The hem of the collar will have some curved lines running parallel to each other; then, you can draw some straight lines down for the sides of the collar.You can then use some more downward slant for his shoulders and add some line detail to them. That should wrap up the final details of this tutorial, and you’re ready to go! Before you do, you can also add some details of your own. These may include drawing the rest of the body or drawing the background. If you agree with that idea, you can recreate your favourite Todoroki scene! These are just a few ideas, but there are tons of ways to get creative with it, so make sure to have fun and see what you can create!
Step 6: Finish your Todoroki drawing with some colours.
Part of Todoroki’s personality is his duality with fire and ice, and these elements are reflected in his design. Half of his hair is white for the side that controls the ice, with a darker purple for the other side and a scar representing fire. We used this palette in our reference image, so you can use it as a guide as you colour your Todoroki drawing! Another way to include some colour variation is to experiment with different art tools and media. Also read 20 Insane Minecraft Builds